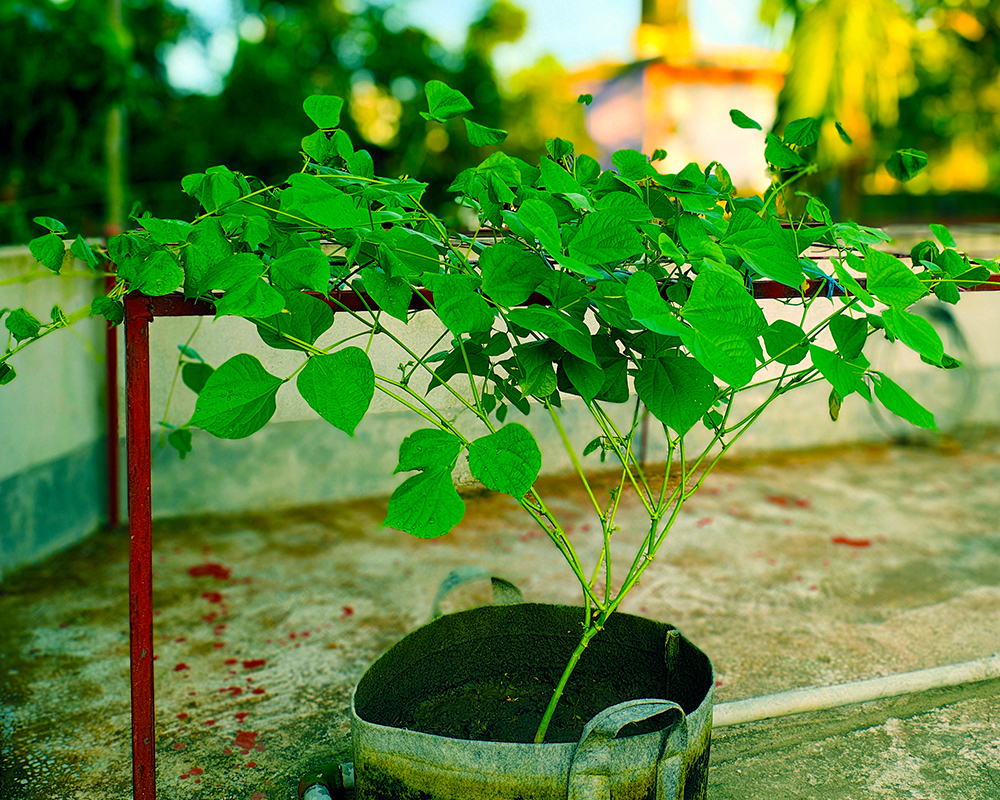
Step-by-Step Bean Plant Cultivation in GEO Bags for Gardens
Introduction
Beans are a global superfood, high in protein. The seeds are also tasty as a veggie and packed with protein, minerals, fiber and vitamins. Although the bean plant is a winter veggie, many improved varieties can now be grown in summer too.
In this post I will share my personal experience of growing beans from seed to harvest in a GEO bag. GEO bags are perfect for small spaces and I will explain the advantages later. By following the method I describe here you can grow beans in front or behind your house, on the roof or in very small spaces. Alright, let's get started!
Section 1: Preparing for Bean Plant Cultivation
It is always better to prepare for any task. I will discuss the materials needed below. So, get ready.
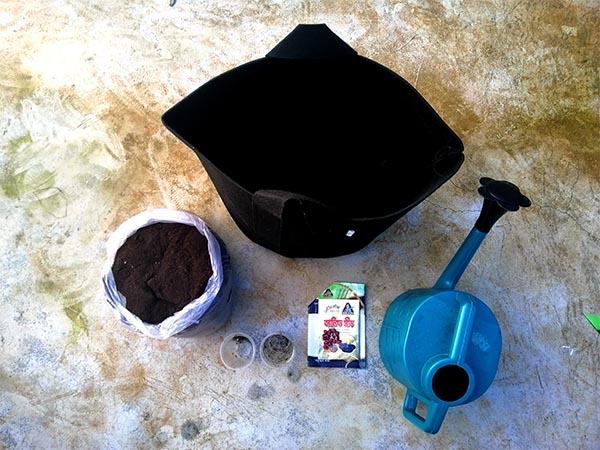
- Firstly, good quality seeds: This is very important. It is essential to collect good-quality seeds. Currently, all hybrid varieties are good. American Bush, Blue Lake, Kentucky Wonder, Macarthur, Stringless, etc., are many popular varieties. You can plant any of your choices. Three things need to be considered here:
- A good company
- The seed date should be within a year. Older seeds do not germinate well.
- You need to select the variety according to the season. That is, choose summer varieties for summer and winter varieties for winter.
- GEO bags: I always prefer GEO bags for small spaces. There are many reasons for this:
- GEO bags are excellent for drainage, which is very important for bean plants. Bean plants do not like waterlogging.
- GEO bags have numerous small holes that help keep the soil good for the bean plant.
- GEO bags can be easily moved from one place to another, and these bags do not get damaged easily. They can be used for 5 to 7 years without worry. There are many other reasons why I use GEO bags. You will understand if you use them.
- Quality soil: Sandy loam, sandy clay loam, and silty loam soils are suitable for bean plants. Slightly loose soil is suitable for bean plants as it allows the roots to spread easily.
- Organic compost: Various brands of organic compost are available in the market. You need to check for a good company. Vermicompost is also good for this. However, homemade organic compost is the best. I have a post on how to make organic compost at home, which you can check out later.
- Small pots: We will use these small pots for seed germination. I am using small plastic cups for this. However, make sure to make holes at the bottom of the cups to allow drainage.
- Watering can: This is an optional item. You can water the plants with anything. However, if you have a watering can, it allows you to sprinkle water nicely.
Section 2: Germinating Bean Seeds in Pots
Next, you need to sow the seeds. Many people sow the seeds directly into the soil and the plants and fruit grow fine. But in my experience I have found that if you sow the seeds first and then transfer them to a GEO bag or another place the bean plant becomes stronger and produce more fruit. So here I will sow the seeds first and then proceed to the next step. For a good harvest you should also sow the seeds in small pots.
Here are the steps to germinate the seeds:
- Take the seeds out of the packet and leave them outside for 6 hours to acclimate to the environment.
- Then soak the seeds in any container for 12 hours. Adding a little hydrogen peroxide to the water is optional but good.
- Mix half soil and half organic compost.
- Make sure to create holes at the bottom of the container before planting the seeds to prevent waterlog.
- Now fill the small plastic pot with soil and plant the seeds 1 to 2 inches deep. You can plant 2 seeds in each pot.
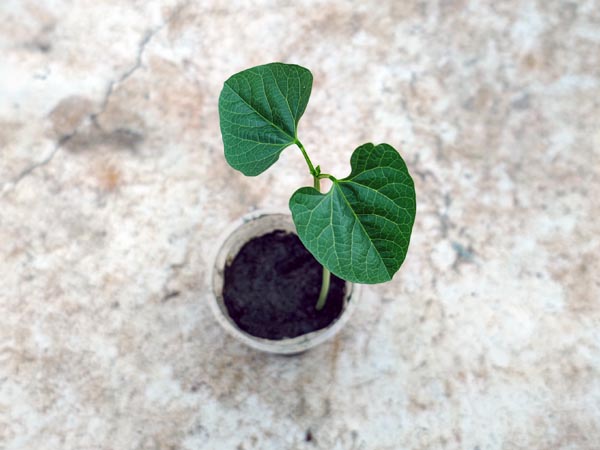
Put the containers in a dry and bright area but not direct sunlight. Check daily and water the Bean Plant if the topsoil is dry. You should see the bean plants germinate within 7 to 10 days. If the seeds take longer to germinate it means the seeds are bad.
Section 3: Transferring Bean Plant Seedlings to GEO Bags
My seeds have germinated well. Bean plant seedlings can be transplanted when they have 4 to 6 leaves. Another rule of thumb is to transplant them within 15 to 20 days of germination. My bean seedlings have 6 leaves in 15 days, so I will transplant these seedlings into my GEO bags now.
I will explain the process step by step below:
Soil Mixture: I already discussed the soil earlier. In this case I will use loam soil. Loam soil has good water retention. (Tip: If loam soil is not available, you can mix 5% cocopeat with the soil you are using, which will help retain moisture in the soil). The ideal pH for bean plants is between 6.0 to 6.8. This type of soil usually maintains the correct pH. You can check it with a pH meter to be sure.
Organic compost is good for bean plants. From my previous experience I found that using 1 part soil and 1 part organic compost 1:1 ratio gives good results. I mixed my soil and organic compost.
Size of the GEO Bag: It’s better to use slightly larger GEO bags as the roots of the bean plant can spread wide. In my case I’m using 16x12 inch or 10-gallon GEO bag. You can use slightly smaller bags if you prefer and it won’t be a problem.
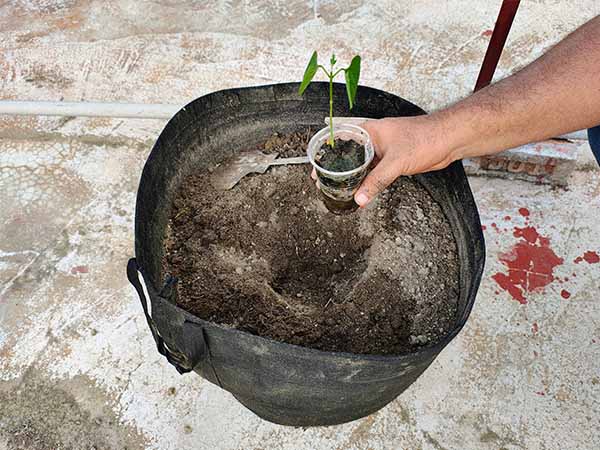
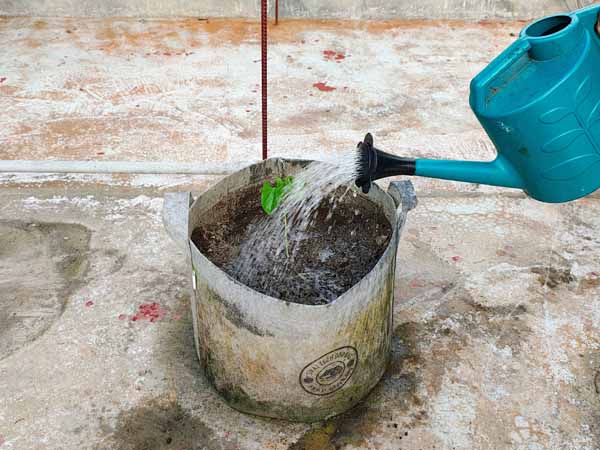
Placement: Since the soil is ready I will now fill my GEO bag with the soil. While filling the bag I will press the soil with my hand to make sure there is no air trapped inside. Trapped air in the soil can cause fungal infections. Fill the GEO bag in such a way that there is 2 to 3 inch gap from the top. I will now carefully take the seedlings out of their containers and plant them in the center of the GEO bag then cover the surrounding area with soil. After planting the Bean Plant seedlings I will water them thoroughly.
Sunlight: Bean plants need sunlight. I will place the GEO bag in a spot where it will get 6 to 8 hours of sunlight a day. Without enough sunlight the plants will be weak so this is crucial.
Section 5: Watering and Care for Bean Plant
Watering Schedule:
We all know that watering plants in the morning and late afternoon is ideal. This is true for any plant. During these times, the soil is cool, and watering hot soil causes evaporation, which is not good for the plants. We will water the bean plant as needed in the morning and evening.
Soil Testing:
Sometimes, after it rains or if the soil is already moist, we are unsure whether to water the bean plants. By paying attention to one small thing, you can determine if watering is necessary. Check if the top 2-3 centimeters of soil have dried. If it is dry, water the plants; if the topsoil is still moist, do not water. I hope this makes sense to you.
Correct Amount of Water:
By the correct amount of water, I mean that the soil should always be moist. Often, we water the plants but the water accumulates, and if it does, the roots will rot. Therefore, water in such a way that it doesn't accumulate but the base of the plant doesn't dry out either. In other words, the soil should always be moist.
Mulching:
Many people use various methods to retain soil moisture, such as using cocopeat, which is a good method. However, I recommend mulching, which I have tried and found very effective. It's a simple method: to retain moisture at the base of the plant, use dry leaves, straw, or wood chips. This is called mulching.
Drainage:
If you use GEO bags for planting beans, drainage will be easy. However, if you are using buckets or other containers, make sure to make holes at the bottom to prevent excess water accumulation. Excess water is very harmful to the roots of bean plants.
Inspecting Leaves and Stems:
Every plant can be affected by diseases, including bean plants. To maintain the plant's health, regularly inspect the leaves and stems. If you notice any disease symptoms, such as yellowing leaves, brown spots, or pest attacks, take immediate action. To detect pest attacks, check the underside of the leaves where pests often hide. Once a problem is identified, take immediate measures like using natural insecticides or pruning the affected parts.
Natural Pest Control:
I always control pests naturally. There are many chemical methods, but it’s better to avoid them. In this case, I mix 10 to 15 ml of neem oil in 1 liter of water and spray it every 5 to 7 days for 3 to 5 times, which works well. You can also spray soapy water or detergent-mixed water for good results. Additionally, many organic pesticides are available in the market that you can use. Just make sure to choose a good brand.
Fertilization:
To achieve good yield and health, bean plants need regular feeding. Every 3-4 weeks, I apply organic fertilizers such as decomposed manure or compost. Before applying the fertilizer, loosen the soil around the base of the plant, sprinkle the fertilizer, cover it with loose soil, and then water adequately to mix the fertilizer with the soil.
Plant Support:
Bean Plant growth happens quickly, requiring support. As they grow, their stems need support. There are many ways to provide support, such as using bamboo sticks or creating trellises. Initially, support the stems with bamboo or sticks and tie them to lift them onto the trellis. I have detailed the process of making a trellis below. However, ensure that the stems do not trail on the ground and that the plants get enough light and air.
Pruning:
Timely pruning of old and dead leaves from the lower part of the bean plants is very important. This increases the plant's resistance to diseases and creates space for new leaves to grow. Pruning old leaves helps direct nutrients to the new leaves, promoting overall growth and yield.
Section 6: Supporting Bean Plant Growth
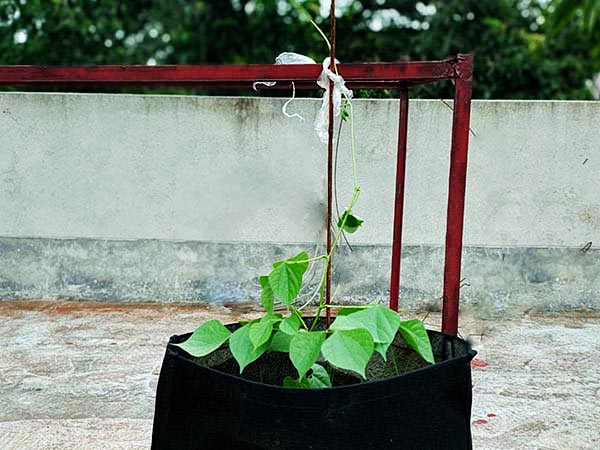
Bean plants grow very quickly. It is necessary that the plant, when it reaches a height of about 3 to 4 feet, be tied to a stick or a bamboo to prevent it from falling. I used a rod myself, which I inserted into the soil of the GEO bag, and then gently tied the bean plant's stems with rope. However, be careful not to tie it too tightly, as this could damage the tender stems.
Now, it’s time for the bean plant to climb the trellis. Although the variety I planted is a dwarf one, a trellis is still necessary. Since I grew my bean plants on the rooftop, I made the trellis entirely out of rods. You can always use bamboo if you have some; there are just so many ways to create a trellis. I did actually write an article on making a trellis, Here is the link DIY Metal Trellis: Step-by-Step Guide for Your Garden. I hope this resolves any issues you might have regarding the trellis.
Section 7: Bean Plant Pest Control and Maintenance
The stems and leaves of the Bean Plant are extremely soft. Due to their high levels of carbohydrates and protein, they tend to attract more insects. Bean plants require special attention. Achieving effective pest management and frequent monitoring are essential to maintain well-groomed and productive plants. I employ organic methods to deal with these issues. Below, I've provided the organic methods that have proven successful for me. I'm confident you'll also achieve great results with these strategies.
Identifying Pests:
If there's any issue with the bean plant, it can often be detected by examining the leaves. The leaves may initially change color, develop holes, or the growth could slow significantly. These signs suggest an infestation of insects. Based on my experience, the most hazardous pests to bean plants include spider mites, aphids, and bean beetles. These insects are tiny and usually not easily visible to the untrained eye. They extract sap from the leaves and, in some cases, even eat the leaves.
Aphid:
Aphids are tiny, soft-bodied insects that can be black, green, or brown in color. They are usually found on the underside of the bean plant's leaves and reproduce rapidly. Aphids drain sap from the stems and leaves, which hinders the growth of the plant. As a result, the leaves may curl and become distorted, eventually weakening the plant.
Another indication of an aphid problem is the sticky layer that covers the leaves, known as honeydew, which is produced by aphids. This honeydew makes the leaves and surrounding areas sticky, attracting ants that may further damage the plant. Furthermore, fungal diseases such as sooty mold can develop on the sticky surfaces of the leaves, interfering with the plant's ability to absorb nutrients.
Spider Mite:
Spider mites are tiny spider-like bugs, typically red, yellow, or green in color. They build intricate webs on the underside of leaves and suck sap, leaving small brown or yellow spots on the leaves. Due to their tiny size, spider mites can be difficult to spot at first.
If plants are infested with spider mites, the leaves may turn yellow and eventually die. One of the most important indicators of a spider mite infestation is the appearance of finely woven webs on the leaves, typically on the stems and undersides. These webs block air circulation and light absorption, adversely impacting the plant's health.
Bean Beetle:
The bean beetle is a widespread insect that is particularly harmful to beans. These beetles are tiny and oval-shaped, typically black or yellow. Bean beetles chew through leaves, causing small circular holes that disrupt the plant's growth and productivity. These holes can hinder the process of photosynthesis, which is vital for the plant's health.
Bean beetles infest both sides of the leaves, and over time, the leaves can become severely damaged. This damage weakens the plant and can reduce its yield. Additionally, the larvae of bean beetles can attack the roots of the beans in the soil, causing further harm to the plant.
Organic Methods for Pest Control
Organic methods are effective in fighting insects that attack beans. They don't just rid the beans of pests, they can also improve the natural growth and the well-being of soil. Below are a few organic methods that have proved to be effective in my own personal experience.
Neem Oil
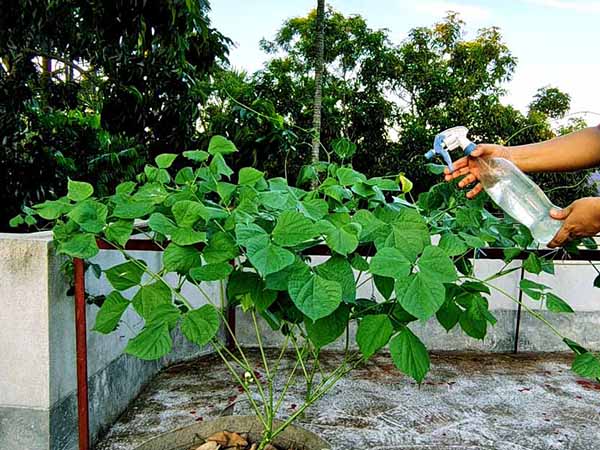
How to Use: Neem oil acts as an organic pesticide that affects insects' life cycles as well as reducing their reproduction and growth. To use neem oil one teaspoon of the oil in 1 Liter of water. Then, fill an aerosol container the mix and spray it on the affected areas of plants, particularly under the leaves and on the stems, as Aphids and spider mites commonly occur in these areas.
How It WorksNeem oil is absorbed into inside the human body of a insect and interferes with their reproduction, growth, and the process of feeding. The pests are slowly killed by reducing their attacks upon the plant.
Personal Experience: I have had excellent results using neem oil especially when it comes to controlling spider mites. I usually spray it twice every week, making sure that the leaves and stems are completely covered. If the issue is significant it might be necessary to spray on a regular basis for two days or more. But, based my own experience, spraying every week once is sufficient.
Companion Planting
Example: Companion plantation is a typical method of planting where specific plants are planted with bean plants to ward off insects. For instance, nasturtiums and marigolds are naturally effective in keeping insects away. The scent of marigolds keeps off pests like nematodes as well as aphids. They are kept far from the plants.
Real Experience: When I first planted marigolds as well as nasturtiums in the vicinity of beans, I noticed significant reductions in the amount of attack by aphids and bean beetles. They protect beans naturally from aphids and other pests. I have used this method throughout the year and it has proved to be to be extremely effective in keeping pests from my garden at a lower degree.
Handpicking Pests
Method: Handpicking pests is a successful method for small-sized gardens. This involves inspecting manually every stem and leaf to identify pests, then eliminating them manually. Pests are at their least active during the early morning.
My Experience: My experience has been that handpicking pests from small spaces can be extremely efficient, particularly for insects like caterpillars or bean beetles. It is time-consuming, but frequently reduces the need to employ pesticides that are chemical. This method has enabled me to shield the beans I grow from pests many times.
Insecticidal Soap
Use: Insecticidal soap is a powerful and safe method of killing soft-bodied pests like spider mites and aphids. To use it, mix the soap with water in the spray bottle. Spray directly onto the areas affected by the plant. The soap kills insects by destruction of the outer layers of their body.
My observation: I was able decrease the amount of spider mites, aphids as well as other insects employing insecticidal soap. This method has proved to be most efficient method in my experiences for combating Aphids. The soap may leave spots on the leaves if applied in the direct sunlight. It is recommended to apply the soap after dark or early in the morning.
Chapter 8: Harvesting Beans from Bean Plant
Signs that Beans Are Ready for Harvest
As it's crucial to determine the optimum time and date to harvest the beans, it is vitally important that they are harvested when ready. Signs on the plant itself indicate when this should occur - size and shape being great indicators. Harvest time occurs once beans have reached maximum size but have begun to thin; too-thick beans become difficult to consume.
Change in Color: Beans will begin to change color as they mature and then once dried will lose much of their hue. By touching the beans you can determine when it is time for harvest; harvest time occurs when firmness can be felt in both seeds and firmness of body of beans is visible - it is best to wait until all these conditions exist before picking.
Finding the optimal time and way to harvest beans can be extremely crucial. I discovered this when my initial attempt resulted in overripe and difficult-to-eat beans. Since then, I rely on color, shape, and feel of beans to determine when harvest is required; these days it works much better! To optimize results I suggest monitoring plants daily for any changes; harvesting at their proper times ensures nutrients will remain preserved as well as flavor.
Harvesting Beans From The Bean Plant
Care should be taken when harvesting beans to avoid damaging the plant and reduce future yields. Gently pull each bean off of its stem using one hand while you pick them using another; too much force may break stems and result in reduced future yields.
Some bean stems can be very tough. When this occurs, use sharp knife or scissors to slice through them with precision so as to minimize damage to other parts of the plant while still ensuring more beans will come forth from its stems. Doing this will also ensure more canes come from each plant! This process will ensure minimal disruption while increasing production by producing more beans from each stem cut.
My experience has shown me that harvesting beans early morning works best. Fresher, firmer beans combined with cooler temperatures allow less damage to plants and longer storage. When I first harvested beans, some stems accidentally broke. Later I learned that pulling them too forcefully can damage them; since then I harvest every two or three days with scissors, encouraging new flower and bean growth and increasing production of beans.
After harvesting beans, continue to monitor and tend your plants; water it for several more days, and lightly till the ground to promote air circulation.
- Image: "Harvesting Beans"
- Alt Text: "Hand harvesting ripe beans from plants in GEO bags"
Chapter 9: Post Harvest Bean Plant Care
Taking proper care after harvesting bean plants is vital in order to increase future yield. Here are a few simple tips on keeping them healthy and productive
Lifespan and Yield of Bean Plants:
Bean plants typically produce beans for 2-3 months depending on their type and care needs, though this timeframe may differ depending on your personal circumstances and individual plants. Once harvested, plants often continue producing buds and beans until another harvest cycle comes around - usually up to two more harvests after initial production has ended! To help your bean plants produce continuously make sure you provide it with ample care and nutrients!
As your plant ages, its leaves may begin to yellow and yield fewer beans; when this happens, it may no longer produce any more beans; at this stage, it would be prudent to pull up and replace the old plant with new seeds as this helps prepare your soil for the coming growing season.
Regeneration and Fertilizer Application:
Once harvested, plants can begin regenerating themselves - this process is known as regeneration. To assist this process, additional nutrients may be required.
Fertilizer Application: When rejuvenating, apply organic fertilizer every 2-3 weeks using compost or vermicompost, not exceeding 100-150 grams per plant. Spread it around the base of each plant, mix lightly into soil, and water it regularly - this gives your plant access to essential nutrients needed to produce new buds and beans!
Mulching: What It Is and Its Importance for Bean Plant:
Mulching involves covering the soil around a plant's base with a thin layer of material such as straw, wood chips or leaves to keep the soil moist while controlling temperature and preventing weed growth. Mulch should be applied regularly throughout the growing season for best results.
Mulching Is Essential: After harvesting beans, mulching helps protect and nourish their roots to ensure a healthier bean crop. Mulch can keep soil cool and damp, helping the regeneration of new roots. Furthermore, it creates a protective barrier which slowly releases essential nutrients back into the ground for plant nourishment.
What to Do When the Bean Plant Life Cycle Is Complete:
Once a bean plant's lifecycle comes to a close and its leaves turn yellow and it stops producing beans, remove the old plant from the soil and prepare it for new seeds by cleaning the top layer and adding in compost or fertilizers to make sure that its ready for a new growing season. This will make sure your crop reaps maximum harvesting success during its next growing season!
- Image: "Storing Harvested Beans"
- Alt Text: "Freshly harvested beans stored in a basket"
Conclusion
Growing beans is easy and enjoyable when done properly. From planting seeds to harvesting and managing their lifecycle, each step matters for success. GEO bags allow for excellent yields even in small spaces - providing your family with food they need!
Organic methods of controlling pests and diseases help preserve both plant health and the environment. Careful harvest care of harvested crops as well as soil preparation prior to new planting will produce improved yields.
I am sure if you do as I say, you'll easily be able to grow beans in your garden and reap a plentiful harvest. When cultivating beans, not only are you producing food but you are also forging an intimate connection between nature and yourself - and by following each step carefully you will reach great results!
- Image: "Home Garden Overview"
- Alt Text: "Thriving home garden with various plants growing in GEO bags"
All Categories
+0123 (456) 7899
contact@example.com
